There are hundreds of Windows 7 performance tweaks, but you only need the handful listed here to obtain a significant performance boost. The rest of the tweaks you might find will only give you minor and often indiscernible performance benefits, and as you will soon find out, Microsoft’s performance advice should be given a very wide berth.
Some of the Windows 7 performance tweaks documented here require you to edit your Windows registry. kadaitcha.cx accepts no responsibility or liability for your choice to make changes to your registry, or for any other changes you make to your system. There may be serious consequences from making changes and the responsibility for that is entirely your own. In short, you should not perform any registry edits unless you know what you are doing. To start the registry editor in Windows 7, Click Start, type RegEdit in the Start Search box and press enter.
If you don’t consider yourself an advanced user or if you’re concerned about editing your registry to get the best out of your Windows 7 then it’s recommended that you skip the main tweaks and read the More Tips section. You can get to More Tips by clicking here.
Before we look at the tweaks available, kadaitcha.cx has to resoundingly rag the Microsoft Borg. If you want to skip the ragging you will find the first tweak here.
Performance Tweaking the Microsoft Way
One might be forgiven for mistakenly believing that Microsoft has a firm grip on ways to improve Windows 7′s performance; it ought to have but it doesn’t. Microsoft’s advice is to tout their “Performance troubleshooter”, “which can automatically find and fix problems. The Performance troubleshooter checks issues that might slow down your computer’s performance, such as how many users are currently logged on to the computer and whether multiple programs are running at the same time.”
Say, what? Multiple programs running at the same time? Ok, let’s give it a run… we’ll soak up a few gigs of RAM by launching 5 instances of Google Chrome, 5 instances of Firefox, one instance each of the Snipping Tool, Windows Live Mail and the Control Panel, 5 instances of IE8, 5 instances of Notepad, 5 instances of the FileZilla FTP client, 5 instances of Visual Studio Ultimate 2010, 5 instances of MS Paint, 5 instances of Word 2010, and 5 instances of Microsoft Expression Web 4…
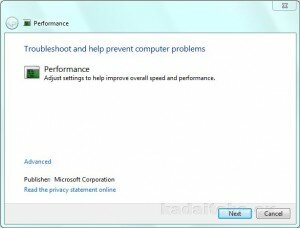
Ok, now where did I put the performance troubleshooter… Ah…
Now, to click Next:
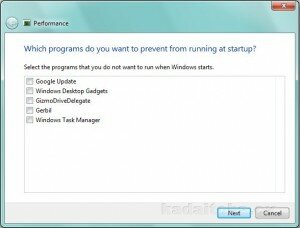
See Performing a Clean Boot for information about msconfig. Ok, nothing to see there, move along, move along… to the next screen:
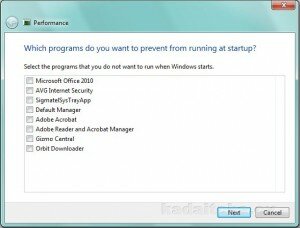
Ok, nothing to see there either, move along, move along… to the next screen:
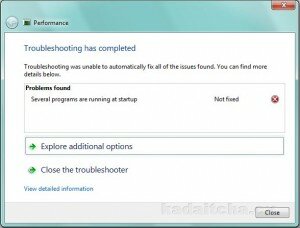
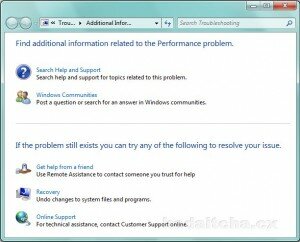
Maybe if we explore the additional options…?
You might think this is a joke; it isn’t, but Microsoft’s performance advice is. First they tell you to try the Performance troubleshooter, which, as we’ve just seen, only reports startup items and does nothing at all about multiple instances of programs. But wait, it gets worse… Microsoft recommend that you reboot regularly.
But wait, there’s even more silly advice from Microsoft. “If you try these tips and your computer is still too slow, you might need a new PC or some hardware upgrades, such as a new hard disk or faster video card. There’s no need to guess the speed of your computer, however. Windows provides a way to check and rate your PC’s speed with a tool called the Windows Experience Index.”
Well, the truth is, the Windows Experience Index is a load of rubbish. kadaitcha.cx has three machines that have the very same Windows Experience Index of 5.9. One is a clunky, old dual core Intel processor with a single stock hard disk, one is a 16GB RAM quad core Intel Extreme beast with several terabytes of storage in dual RAID 5 configuration that’s faster than greased lightning, and the other is a 6 core AMD 1090T monster with two RAID0 sets that can pump 8x the bandwidth of a standard disk. The reason these three machines rate at the same “Windows Experience Index” is because Microsoft have kludged the disk scores. You can read about it here: Low Disk Score for Windows Experience Index
Getting back to “If you try these tips and your computer is still too slow, you might need a new PC…”; It seems to have completely escaped someone at Microsoft that if you’re looking on the Internet for performance tweaks it’s more than likely that you are trying to avoid the expense of buying a new machine.
Beware of bogus tweaks
There are certain websites promoting a bogus tweak that references a non-existent Microsoft Knowledge base article (KB959233). At best, the ‘tweak’ does absolutely nothing. At worst, you may have to restore your system either from system restore or from a backup. The alleged tweak involves setting the number of processors to use at boot time from within msconfig. By default, Windows 7 uses all available processors. If the tweak is recommended to you, give it a wide berth because it is intended as a debug facility for software and hardware developers. The setting is used to reduce the number of processors available at boot time, not increase them.
Tweak #1: Disable Last Access Timestamp
Whenever Windows 7 reads a file, it stamps the file with the date and time that you accessed it. This feature has its place but is not required for normal use unless you rely on the date of last access for backup purposes, which is a rare requirement for most backups. Putting a timestamp on a file that has just been read means that a write access has to be made to disk, so every time a disk read is executed, a corresponding disk write is also executed.
To disable the last access timestamp behaviour, start a command prompt, enter the following command then reboot:
FSUTIL behavior set disablelastaccess 1
Those of us who read and write Her Majesty’s English need to take note of the American spelling of the BEHAVIOR parameter.
To turn timestamps back on, repeat the command but replace 1 with 0:
FSUTIL behavior set disablelastaccess 0
Tweak #2: Disable 8.3 Filenames
If you’re not into messing with your OS’ file system, and you’re 100% certain you don’t use any 16-bit applications that rely on DOS 8.3 filenames, then you can disable DOS 8.3 filename creation. This change will greatly improve Windows Explorer’s directory enumeration. If you have a large number of directories then this tweak may afford a significant improvement.
At the command prompt, enter the following then reboot:
fsutil behavior set disable8dot3 1
The only time in the last decade that kadaitcha.cx has ever needed 8.3 DOS-style file names was while trying to delete a Linux file that was copied to an NTFS partition. The file simply refused to be deleted, and even then trying to delete the file using its 8.3 name failed.
Tweak #3: Don’t Mess with Kernel Paging and Cache Tuning
kadaitcha.cx’s XP and Vista performance tips include a pair of registry tweaks to set DisablePagingExecutive and LargeSystemCache. In pre-Windows 7 times the tweaks were highly effective, more-so in XP but they are pretty much redundant in Windows 7 because it handles caching so much better than either XP or Vista ever did.
DisablePagingExecutive is not required because the Windows 7 memory manager will try to keep the executive in memory at all times. The LargeSystemCache part of the tweak is also not required in Windows 7. The setting allowed earlier versions of Windows to cache file system accesses, an aspect that Windows 7 is vastly superior in to both XP and Vista. ReadyBoost, which is discussed later, offers a much better alternative because it has been greatly improved since it was introduced in Vista.
There is nothing stopping you from applying this pair of tweaks (they can be found here: https://kadaitcha.cx/vista/ad_hoc/faq/performance.html). They do still function. You can try them and see if they provide you with any benefit, but if you do set them and Windows 7 starts to get low on RAM, the memory manager will look for ways to get more. If you’re running Aero, that’ll be the first thing the memory manager will grab, and it won’t even ask your permission, it will simply take it. You are far more likely to hit this kind of low RAM symptom in Windows 7 if you enable these now outdated tweaks because you are effectively telling Windows 7 to keep things in RAM that really do not need to be kept in RAM.
Tweak #4: Turn Off Windows Search
Some people have made this tweak controversial in that they claim to not notice the effects of the Windows Search Service soaking up processor time in the background, which could be because they’re not very observant, or because they are using a fast, high-end multi-processor computer with untold Gigabytes of RAM to waste. The point is, if you don’t believe this tweak will offer you any benefits, just don’t apply it, but please, keep your highly uninformed mouth shut; most of us have to make do with what we have and can’t afford to fork out hard-earned cash for the latest and greatest hardware.
kadaitcha.cx lampooned the Windows XP Indexing service in this way:
The phrase, “typically uses lots of pagefile space and lots of CPU time” looks like a Microsoft marketing droid’s spin on the plain English meaning of, “This is bloatware.”
Unfortunately, the Windows Search Service wasn’t much better in Vista and with Windows 7 being a fixed-up Vista, it’s no better either. Microsoft’s documentation for the Search Service states, in part:
“Provides content indexing and property caching for file, email and other content (via extensibility APIs). The service responds to file and email notifications to index modified content.”
What that means is that the Search Service not only scours your hard disk to index everything it can find, it kicks off whenever you copy files or receive an email, and it does useless things like caching emails; only those unfortunates who suffer obsessive-compulsive disorder need cached emails so they lose little time loading it when they need read it for the umpteenth time.
If your system isn’t a leading-edge, high-end machine then turning off the Search Service will buy you additional performance in more ways than one.
Microsoft warn:
If the service is stopped or disabled, the Explorer will not be able to display virtual folder views of items, and search in the Explorer will fall back to item-by-item slow search.
Virtual folders are Microsoft Borg marketing-drone speak for what we in the real world call saved searches. Unless you make extensive use of saved searches there is no pressing reason to leave the Search Service running at all.
As for Microsoft’s statement, “Explorer will fall back to item-by-item slow search”, well, that’s easy fixed. A much better searching alternative is Agent Ransack by David Vest of Mythicsoft, and it’s free for both home and business users.
With the Search Service turned off, Windows Exploder’s search is woefully slow, and with it turned on there is no guarantee you’ll find what you’re looking for anyway, either because Microsoft’s indexed search returns so many irrelevant entries for you to pore over or because Microsoft’s indexed search simply cannot find what you’re looking for, despite you knowing full well that it exists. That latter point is discussed in a little more detail below.
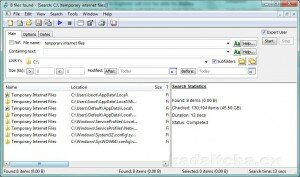
A test search for Temporary Internet Files had to be manually stopped after more than two minutes using Explorer search, and even then it only found one instance of Temporary Internet Files. Agent Ransack (discussed below), on the other hand, took exactly thirteen seconds to scan a 400GB hard disk drive and found 8 instances:
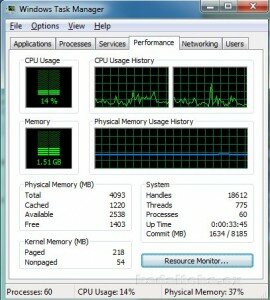
And one more parting shot at those who believe this tweak does nothing; this is what happens when the search service is turned on and nothing else is running:
There are other issues with Windows Search too, it suffers the same problem as all search engines, stupidity. With the Search Service turned on a search for Temporary Internet Files returns any entry that contains any of the words, so you will get results for ‘files’, ‘temporary’ and ‘internet’. Yes, the results are returned very quickly but you can bet your brains to a bucket of smashed crabs it’ll take you longer than 13 seconds to sift through the list several times while you scratch your head and wonder which of the many entries is the one you want. It will take even more time to overcome the realisation that the indexed search did not in fact return what you were looking for anyway. That’s right, the indexed search returns everything except the folder named Temporary Internet Files.
That is not, by any stretch of the imagination, productive.
Applying this tweak
Agent Ransack by David Vest of Mythicsoft is highly recommended. You can read the kadaitcha.cx review here or you you can go straight to Mythicsoft and download Agent Ransack by clicking here.
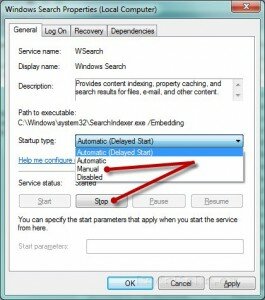
To turn off the Windows Search service, use services.msc.
To start services.msc in Windows 7, Click Start, type services.msc in the Start Search box, and either press enter or click services.msc in the Programs list.
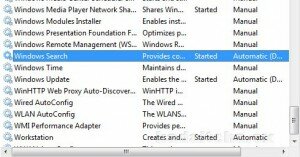
Scroll to the “Windows Search” entry in the right-hand pane:
If the word ‘Started’ doesn’t appear in the status column and the Startup Type column shows ‘Manual’ or ‘Disabled’ then you have nothing more to do, otherwise double-click the Windows Search entry, stop it and set it to manual start:
You can also Disable the service if you wish. Click the Stop button and wait for the service to stop then click OK. That’s it.
Tweak #5: Turn off WHAT?
Turn off Aero, themes and visual effects.
As ridiculous as it sounds, if you want a very responsive user interface because you are more interested in getting work done than looking at Windows 7′s wow-factor graphics, then turning off Aero, themes and visual effects has got to be the best idea since sliced cheese spread was invented. This tweak is especially suited for laptops but it works just as well for desktops.
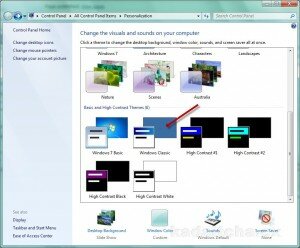
You can disable all of Windows 7′s visual effects by right-clicking the Desktop and selecting the “Personalize” menu item. Scroll down the list of themes and select “Windows Classic”:
Congratulations. You just recovered up to 700MB or more of shared memory from Windows Aero. Windows allocates a large chunk of shared memory for Aero, which is used when Aero is turned on. That shared memory is still allocated even when Aero is off but it can now be used by your system instead of by Aero.
If you don’t like the classic style you can always try the halfway point and use the Windows 7 Basic theme.
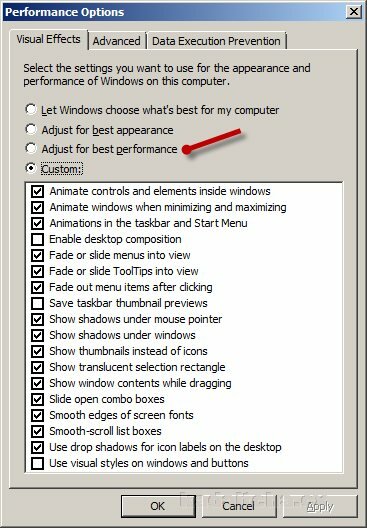
Next, in the Control Panel search box type the word ‘appearance’ and click on Adjust the appearance and performance of Windows:
You can turn off any or all of the following options, and you can turn them all off at once by clicking the Adjust for best performance radio button:
kadaitcha.cx recommends that you keep Show thumbnails instead of icons and Smooth edges of screen fonts turned on otherwise you will probably feel that you are working in a completely alien environment. Windows is genuinely ugly without these two options turned on.
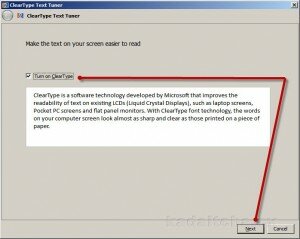
Still in the Control Panel, type ‘cleartype’ into the search box:
Click Adjust ClearType text. The ClearType tuner will appear. Turn on ClearType, click Next and follow the bouncing ball to adjust text to suit your own eyes:
Tweak #6: Don’t disable services
Don’t disable unwanted Windows services.
Does that surprise you? How can doing nothing be considered a performance tweak?
There are thousands of requests on Internet Web forums and in Usenet newsgroups for advice on services that can be disabled, and there are an equal number of Windows-related Websites offering lists of services that can be disabled. So, given that large body of knowledge and apparent expertise in service disabling you may be surprised to learn that kadaitcha.cx asserts it is potentially foolish, certainly it’s counter-productive, and it is technically naive.
Why is it so? There are four main reasons.
- Services and processes that are loaded often do not run when they are unused. At worst, an unused process will merely consume RAM; RAM is cheap, and adding RAM to your machine is one of the best tweaks you can perform anyway. When a process starts up, it tells the Operating System that it needs to be invoked when such and such an event takes place, and the OS dutifully does not invoke the service until such and such an event actually does take place. Thus the process lies dormant until it is invoked by the operating system. Services like the Indexing Service and Perflib (Performance Monitor) execute at regular intervals and can be disabled if they are causing performance issues, but there are very few other services in this class. If you need proof of this, just start Task Manager and look at the list of services sitting there doing nothing other than consuming marginal amounts of RAM.
- Disabling services that you feel you do not need now can lead to major problems when you do need a certain disabled service to run. This is especially going to be a problem if you forget that you have disabled particular services and are unaware that you need the service running to use an application. What happens if you disable the Windows Fax and Scan service, then, say some months later, decide to install Microsoft Office, for example, and try to send a fax or scan a document from within Office? It isn’t going to work, and unless you immediately remember that you’ve disabled the Windows Fax and Scan service, you’re going to be spending far more time troubleshooting the problem than you will save over the entire life of several computers by disabling it.
- Still on the second reason for not disabling services, some websites, no doubt managed by the technically incompetent in many cases, suggest that the DNS Client Service can be disabled, especially if you have a modem/router that performs DNS services; the idea being, “if the modem/router performs the DNS tasks, why let Windows do it?”. The fact of the matter is, the Windows DNS Client Service is a cache of IP and Web addresses, so if you disable this service then you disable the cache. Since caches are intended to boost performance, it should be obvious that disabling a cache will reduce performance. If the DNS cache is enabled then your OS already knows the IP address of the site it wants to communicate with, and it can do so directly, without the router needing to look up the host name on a remote name server in order to retrieve the IP address. To put this in simple terms, by disabling the DNS cache in Windows you force your modem/router to lookup the IP address on a name server somewhere in the big-Internet-cloud-in-the-sky before every single connection is made to a site, and this can take up to several seconds, even if you have a high-speed connection.
- Third, any performance gains from disabling services that don’t execute unless they’re needed anyway will be so insignificant that you will not be able to perceive a performance increase at all. So, if a performance gain cannot be perceived, why bother? To be worthwhile, a performance tweak must have a perceptible performance gain, and the best you can expect from disabling unused services is a few hundred nanoseconds in operating system boot time, which in the scheme of things for today’s PCs, is much less than a small fraction of the time it takes to blink.
- Fourth, there are a number of idle-time tasks that must be performed on a regular basis by the OS. The Task Scheduler runs at regular intervals to check if the system is idle, i.e. not being used, and if the machine is idle, the idle-time tasks are executed. It is pointless to disable tasks that only run when the system is not being used.
So don’t disable apparently unused, running services or tasks because it is completely pointless.
Tweak #7: Move your pagefile
If you have more than a single hard disk, move your pagefile.
This tweak requires at least two hard disks; note “hard disks”, not partitions on the same disk. Based on the assumption that your second or subsequent hard disk is used much less than your system disk (the disk that your operating system and applications are installed on) it follows that there is less disk activity on it, which means the pagefile can be accessed much more quickly on that drive. In addition, Input/Output (I/O) to and from the second disk is performed in parallel to any I/O on the first disk, which means Windows is not trying to batter the heads across the hard disk as it tries to load files at the same time it is accessing the pagefile.
If you have a single disk with partitions then there is no benefit to be gained from this tweak because the pagefile will still be on the same disk, no matter what partition you put it on, and the disk heads will still have to move across the same hard disk to get to the pagefile. By moving the pagefile to a different disk you can obtain significant performance gains if your machine constantly page faults (goes to disk to grab something out of the pagefile).
Note: A page fault is not an error condition. Page faults occur when the OS needs something that is stored on the hard disk, in other words, a page fault occurs when the computer reads the disk. Constant page faulting is indicated by lots of disk activity when, for example, switching applications or starting new ones. If you perceive a lot of disk activity in these situations then you really need to apply this tweak, so if you’ve been contemplating a second hard disk, perhaps now is the time to get it.
This pagefile tweak will perform best if the second or subsequent drive is empty to start with. Failing that, a disk defragment should be performed before applying this tweak to help ensure a contiguous (unbroken) span of space is available for the new pagefile.
In the Control Panel search box type the word ‘appearance’ and click on Adjust the appearance and performance of Windows:
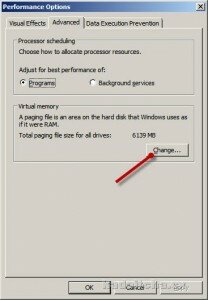
Click on the Advanced tab and click the Change button in the Virtual memory group box:
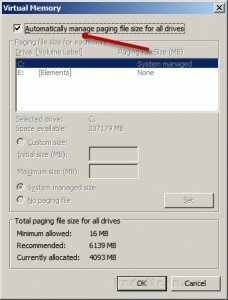
Uncheck Automatically manage paging file size for all drives:
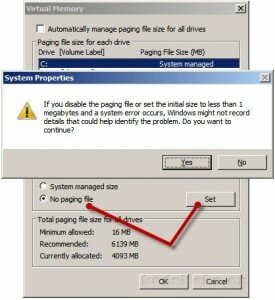
Click the No paging file radio button then click Set. Windows will issue a warning; click Yes and ignore it:
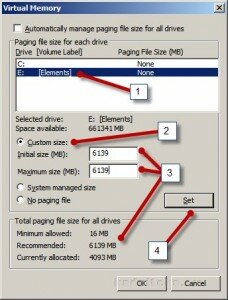
Create a new pagefile on another disk using these steps:
1) Click on the disk that will hold the new pagefile
2) Click the Custom size radio button
3) Read the value for the recommended pagefile size and type it into the fields marked Initial size (MB) and Maximum size (MB)
4) Click the Set button:
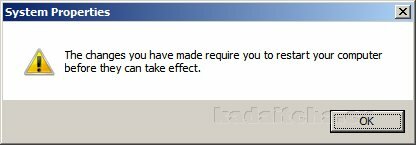
When you click Set, Windows will create the new pagefile then tell you that the changes you made will require a reboot:
Reboot. That’s all there is to it.
You do not have to use a fixed-size pagefile if you don’t want to, however if you elect to allow the system to choose the pagefile, the pagefile will need to grow at a later date but it will be at risk of fragmenting if you have stored files on the disk since creating the new pagefile. It is suggested that you use a fixed size pagefile of the recommended size to avoid later fragmentation of the pagefile.
Tweak #8: Copy files faster
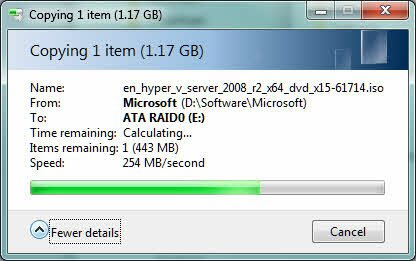
Windows XP was much faster at copying files than Windows 7 is now. Pre-service pack 1 Vista was also much, much faster; pre-SP1 Vista included a file copy engine that supported buffered (cached) synchronous I/O out of the box; an upgraded version of that copy engine is included in Windows 7 but support for buffered synchronous I/O is turned off in Vista SP1 and in Windows 7. Microsoft wants Windows to be all things to all people, and one of the drawbacks to that approach is the trade-offs to benefit some users can disadvantage others; Buffered synchronous I/O being turned off is one of those situations, which benefits low-end machines but not those with higher specification.
What this tweak does
Without this tweak, the Windows 7 copy engine issues a series of large asynchronous non-buffered read requests during a file copy, followed by a series of large asynchronous non-buffered write requests, then more reads and so on, which means the source and destination files are read and written in non-concurrent (asynchronous) chunks… read a few blocks, write a few blocks, read a few blocks, write a few blocks… The problems with asynchronous non-buffered I/O requests are several in number. First, the copy is regularly interrupted while the system goes off and does other things, which slows the copy down. Second, reading a file while writing a file on the same disk causes the disk heads to fly all over the place, which means reduced performance. The trade off benefit for Microsoft is that asynchronous non-buffered I/O requests allow Windows to better estimate the length of time a copy should take; that trade off costs you significant performance.
With this tweak, the Windows copy engine will issue synchronous buffered I/O requests, which means the source file is cached in memory before it is written to disk. File copying is greatly enhanced because moving a file into memory and writing it from memory is, theoretically, several orders of magnitude faster than using just disks. The tweak causes the Windows cache manager to be invoked for file copies, which is why you will see CPU and RAM usage go up if you apply it. The cache manager will suck in as much of the file as it can before it starts to write the data out, which means there are fewer disk reads and writes. Fewer disk reads and writes means higher performance.
The down side
As mentioned in the previous two paragraphs, trade offs are involved with this tweak. The one significant thing you will lose is accuracy in Windows 7′s predictions for the amount of time a copy will take. If you have owned pre-SP1 Vista at some time in the past, you will likely be familiar with it’s woeful inability to predict copy times. Well, Microsoft fixed that by well and truly crippling copy performance. kadaitcha.cx’s view is “forget accurate predictions, just make it faster!”
You should not apply this tweak if you copy files over a slow, high-latency network, especially to a Windows Server 2003 file server. Windows 7 will perform better in that situation without this tweak.
If you have a low-powered CPU and not much RAM then this tweak is not for you. This tweak will cause CPU and memory usage to increase during large file copy operations. If you’ve noticed that Windows doesn’t use much processor time during file copies it’s because the file is not loaded into memory, hence the CPU is virtually unused. In low memory situations this tweak can be detrimental to performance because a large file copy has the potential to force Windows to dump its memory contents out to the pagefile, which is on disk, thus making the tweak pointless. You need a minimum of a reasonably up to date processor with two cores and at least 2GB of RAM to play with.
If you intend to use this tweak to enhance large file copies on the same disk volume then you can try it, however there is a caveat. kadaitcha.cx’s experiments proved an almost 50% performance boost for a 1GB same volume file copy on a slow, old USB HDD, with throughput going from its original 15MB/s to 22MB/s when the tweak was applied. The caveat is that on low-spec equipment you may experience a lack of responsiveness in some applications during large same volume file copy operations; same volume copy means copying a file to another place on the same disk, as opposed to moving it or copying it to a different disk. In its default state, i.e. without this tweak, the copy engine issues smaller I/O requests to free up the disk during a copy for other parts of the system to use, which results in improved responsiveness in applications that may be running while a file copy is in progress on a single volume.
If your machine has a bit of grunt to spare then this tweak may prove beneficial.
WARNING – Applying this tweak may mess with your head
After applying this tweak you may experience a psychological side-effect called cognitive dissonance, which is that awful, uncomfortable feeling you get when your brain tries to hold two quite contradictory ideas at the same time. But don’t worry, it’s only Windows 7 playing tricks on your eyes:
- Copying speed is greatly enhanced by this change
- The Windows “Copying” dialog can’t keep up so sometimes it may:
- A) Appear to stall
- B) Still be trying to estimate time even though the copy has finished
Those two observations describe what pre-SP1 Vista owners sometimes saw. Don’t be fooled by these mirages. Windows Task Manager will show you that the file is copying even though the “Copying” dialog appears to stall. If the user-interface effect really does mess with your head then do some time trials with and without this tweak. The point is, there is perceived performance and there is real performance. What Microsoft have actually done is play with your perceptions, at the cost of your machine’s real performance they have given you perceived performance.
Windows XP uses the very same buffered file I/O technique that this tweak turns on in Windows 7. Buffered file I/O allows XP’s Explorer to load a file into memory and dismiss the “Copying” dialog even before the data has finished being written to disk. In Windows 7 though, Explorer actually waits for a time before it tries to estimate the duration of the copy, and because it has to continually revise its estimates, you are forced to watch the copy dialog and wait until the file is fully copied before it goes away. Some Microsoft Borg marketing droid probably thought it would be a good idea to display an estimate of how long a file copy would take, of course the technical implication is much slower file copying. Funnier still is the idea that whoever dreamed this one up must have been totally witless to the fact that just looking at the green marquee going nowhere at all is an unequivocal indication that the file copy is going to take more than enough time to let you have a coffee break or perhaps lunch.
Sometimes, but not always, the copy will be finished and the “Copying” dialog will still be there trying to work out just what the heck is happening. You may find this behaviour visually annoying, which is why your perceptions might be at odds with what you’re being told about the performance benefit of this tweak, hence the cognitive dissonance.
To put all that into plain English, your Windows 7 Explorer file copying will behave exactly as it did in pre-service pack 1 Windows Vista. It sure isn’t pretty, but crikey, it’s fast.
Applying this tweak
Start RegEdit and navigate to the following key:
[HKEY_LOCAL_MACHINE\SOFTWARE\Polices\Microsoft\Windows\System]
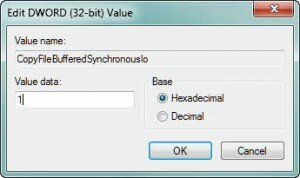
Create a new DWORD entry and name it:
CopyFileBufferedSynchronousIo
Set the value to 1:
To disable this tweak, set the value to 0. There is no need to reboot with this tweak, just save the registry change and exit RegEdit. Windows Explorer always checks for this entry before it initiates a file copy.
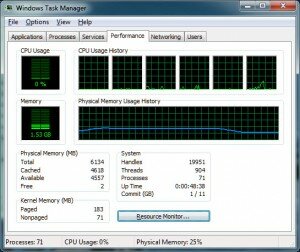
The image below shows Windows Task Manager while a large file copy is in progress. You can see the CPU being consumed on the core at the far right, and you can see the file being cached in memory, indicated by the blue line ramping up. The ramp down at the far right in the memory pane is the cache being flushed or emptied:
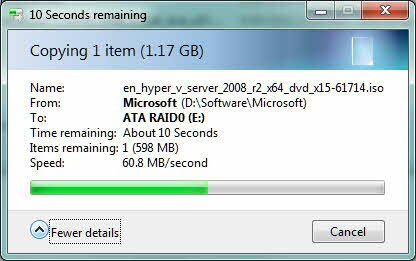
Before
As you can see in the before shot, image above, Windows has copied about half the file and estimated the remaining time.
After
In the after shot you can see that Windows is unable to estimate time of the copy, and while the file is almost two-thirds copied, Windows still hasn’t caught up. Also note the speed of the copy, which has gone from 60MB per second to a very dramatic 250MB per second plus. That’s not the performance of your hard disk, it’s the effective throughput that the cache manager is achieving.
More tips
There are more Windows 7 performance tweaks you can implement to keep your machine well-oiled and running fast.
Tweak #9: Buy more memory
The more memory you have the better. Seriously, if you don’t apply any of the tweaks on this page except one, this is the one you should choose.
The point is, the more RAM you have, the less reliance you have on a pagefile, which is kept on much slower hard disks. RAM is always faster than a hard disk.
If you have sufficient RAM you may not even need a pagefile, though running without a pagefile is not recommended; Windows 7 will run fine without a pagefile but some applications may not. kadaitcha.cx does not recommend turning off the pagefile, even if you have 8GB of RAM. If the pagefile isn’t needed then Windows 7 will not use it, but some applications need to use the pagefile no matter how much RAM you have to spare.
Tweak #10: ReadyBoost
Windows 7 includes a feature called ReadyBoost, which is a cache that can be stored on high-speed USB flash drives to increase Windows 7′s performance. Invest in at least one ReadyBoost-capable USB flash drive (or pen drive), but to get the best out of ReadyBoost, get a flash or pen drive that is about three times the size of your installed RAM. You can also use multiple flash drives, kadaitcha.cx uses six 4GB flash drives, all dedicated to ReadyBoost. Yes, six of them. At 4GB each.
Hey, don’t laugh at using 6x4GB flash drives. At a buck apiece in a clearance store it was a very cheap 24GB memory upgrade.
Windows 7 supports up to 8 ReadyBoost drives, with an upper limit of 256GB in total.
If kadaitcha.cx were into using words like “cool” to refer to a technology (cultural cringe) then this technology would be worthy of the label. ReadyBoost works in conjunction with another technology called SuperFetch. SuperFetch learns what you use your computer for at various times of the day, for example email and browsing the web for news in the morning, followed by some accounting and word processing in the evening. SuperFetch will load up the ReadyBoost cache at different times of the day with different application components in expectation of your habits so that your applications start up with as much speed as possible.
Flash drives are relatively cheap, but before you rush out and buy one, read the kadaitcha.cx article about ReadyBoost USB flash or pen drives to avoid being sold a lemon.
Top Tip #1
If your motherboard supports SATA RAID and you don’t mind spending around $US100 then get a pair of these babies. The Samsung Spinpoint F3 is a high-performance SATA disk and when two of them are setup in RAID0 configuration they absolutely scream at over 200MB/s. Like kadaitcha.cx, the guy in the video below has four of them and the drives are pumping an absolutely awe-inspiring 450MB/s or more between them, which is more than ten times faster than your average ATA hard disk:
Top Tip #2
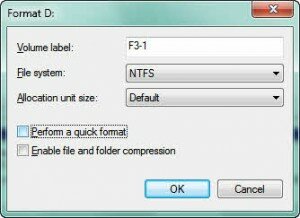
- For standard disks on a machine used in the home or office for general use, a 32kB block will generally give much better disk performance (low I/O rate, high block size)
- If you are using RAID and are doing intensive database work or regularly reading and writing a large number of small files then you want to get the disk heads in their right place as quickly as possible. You do this by employing as large a block (stripe) size as you can afford (large block sizes cost space for lots of small files):
- At least 64kB blocks are recommended in this scenario
- A large block size increases the performance of head positioning
- Again, for RAID, if you do a lot of video work or use Adobe Photoshop, for example, then your disk I/O requests will be large and your machine’s performance will depend entirely on how fast you can move large swathes of data between disk and memory:
- In this scenario, blocks as small as 512 bytes are recommended
- Disk performance is increased because files are broken into small pieces, which increases the spread of a file across multiple drives. Since the data is on multiple drives, the load is more evenly spread across all the striped disks in the array
